
-as of [7 OCTOBER 2026]-
.
-MACBOOK PRO-
-LOCAL WEB SERVER-
-FRESH [WORDPRESS] INSTALLATION-
-WORKING LOCAL [WP DASHBOARD]-
.
-BUILD EMPTY LOCAL ENVIRONMENT-
-PROVE IT WORKS-
-COPY THE [SITE FILES]-
-IMPORT [DATABASE]-
-CHANGE [URLs]-
-VERIFY-
-ARCHIVE-
[LOCAL] + [SSH] + [WP-CLI]
-“LOCAL” IS BUILT TO RUN [WORDPRESS SITES] LOCALLY ON MODERN [macOS] COMPUTERS-
-BLANK SLATE-
-REPLACE [WP-CONTENT]-
-IMPORT [SQL DUMP]-
-RUN [WP SEARCH-REPLACE]-
-LARGE SITES SHOULD BE MANUALLY IMPORTED-
-DO NOT RELY ON THE
.
.
I would not continue the old XAMPP/phpMyAdmin click-by-click method
you learned something useful from it, but we now have a much cleaner combination available:
Local is specifically built to run WordPress sites locally, including on modern macOS, and its documented manual-import procedure is almost exactly what we need: create a blank local site → replace wp-content → import an SQL dump → run wp search-replace Local
and Local explicitly says that large sites should be manually imported rather than relying on its automatic ZIP importer — they already consider >5 GB large, and yours is around 250 GB 😆 Local
WP-CLI also solves one problem in your old notes particularly nicely: instead of those hand-written SQL UPDATE...replace() statements, wp search-replace understands PHP serialized data, which matters in WordPress databases and is substantially safer. WordPress Developer Resources
the database itself is not the scary 250-GB part either — WP-CLI can dump it directly, and Bluehost explicitly recommends command-line database handling when databases are large. WordPress Developer Resources
.
.
.
.
yes — you have plenty of time before 8 October 2026, and after reading that old entry, I think this is substantially less daunting than it looks
the key realization is that your 2024 entry mixes together learning how localhost works with actually cloning Kingdom of JoGa — you already did most of the confusing conceptual learning once
what you successfully built back then was essentially:
Mac → local web server → local MySQL database → fresh WordPress installation → working local WP dashboard
you got all the way to a functioning localKOJ installation and then began documenting the separate process of transferring the real site’s database/files into it kingdomofjoga.com
how long i’d budget
for your unusually huge ~250 GB site, i’d reserve 2–4 working days, but most of that isn’t 2–4 days of sitting at the computer
roughly:
day 1 — build the empty local environment + prove it works
day 1–2 — copy the site files
day 2–3 — import the database + change URLs
day 3–4 — verification/archive
sample old posts from different eras
test private posts
test media
test synced/unsynced patterns
verify huge posts such as Day Tracker
make a second independent copy of the finished archive
only then consider Bluehost expendable
so I would aim for:
-[TARGET: LOCAL COPY WORKING BY 24–27 SEPTEMBER]-
not October 7
that leaves roughly a week and a half of completely unnecessary safety margin before the October 8 payment
and i’d change one major thing from your old plan
the one thing i want to avoid
250 GB → giant ZIP → unzip giant ZIP → Local imports another copy → temporary files everywhere
that’s exactly how you turn a straightforward migration into another storage crisis
given the size of Kingdom, i’d rather:
BLUEHOST
→ SSH/rsync
→ the final local site’s wp-content directory
and separately:
BLUEHOST DATABASE
→ SQL dump
→ local database
no giant Duplicator package
no 250-GB Updraft bundle
no redundant intermediate copy
no manually copying thousands/millions of files in Finder
and rsync gives us the particularly valuable property that if something interrupts the transfer, we resume it rather than starting 250 GB over
one storage caveat
I would strongly prefer the permanent Kingdom archive to ultimately live on an external SSD, rather than permanently occupying most of your MacBook’s remaining internal storage
you’ve recently gotten the Mac back to roughly the mid-300-GB-free range; putting a ~250-GB WordPress installation there would immediately undo most of that work and leave little comfortable room for Premiere/Pro Tools/temp files
we can still build/test it internally if appropriate, but permanent local Kingdom → external SSD + second backup copy is the architecture i’d want
and there’s one thing to do today before migration work starts: redact that public entry and rotate any password displayed in it that has ever been reused — because I could retrieve those credentials from the page without logging into your site kingdomofjoga.com
so basically: this is not a three-week project — it’s a long-weekend project with a giant file transfer in the middle
and the timing is ideal: we can make the next WordPress session simply -[LOCALIZATION — STEP 1]-, start by installing Local and making an empty KOJ.local, and go one screen/Terminal command at a time exactly like we did with SSH/WP-CLI rather than trying to resurrect all 1,000 lines of that old entry 😆
got it — in that case, once you’ve made it private again, we can treat that page purely as your old migration notebook
the only caveat is still the same: if any password shown there is an actual password you still use anywhere, rotate it anyway — but otherwise, making the entry private again closes the immediate exposure
for the localization itself, i’d still keep the same plan: build the local shell first, then transfer the real site into it in controlled pieces rather than trying to move the whole 250 GB as one giant package
🙏
and 400 GB free changes the WordPress picture quite a bit —
that gives us enough internal working room to build and test the ~250 GB local Kingdom without immediately running the Mac into the red.
I’d still make an external copy once it’s working, but we no longer need to solve external storage before starting.
.
.
.
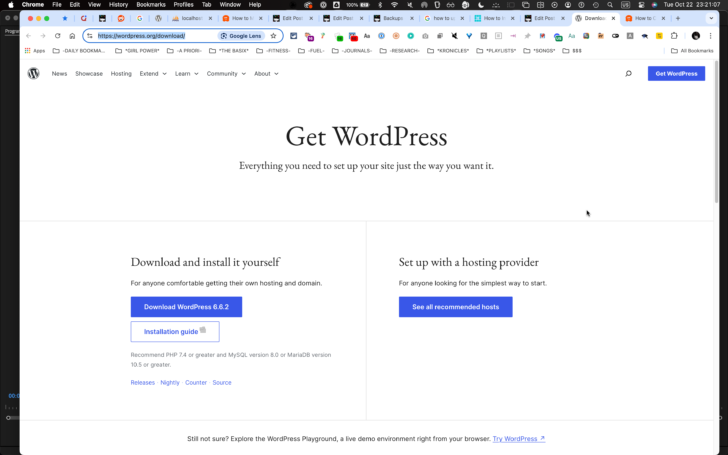
-INSTALL [WORDPRESS] ON [LOCAL SERVER]-
.
.
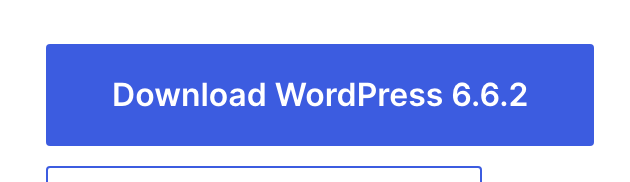
*CLICK THIS BUTTON* —>
.
-INSTRUCTIONS-
(LINK)
.
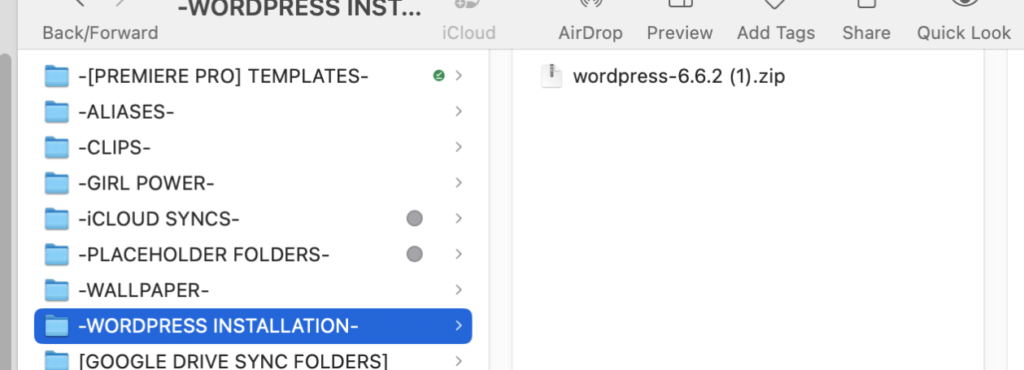
*SAVE TO THIS [FILE-PATH]* —>
‘/Users/joga/Desktop/-WORDPRESS INSTALLATION-‘
.
.
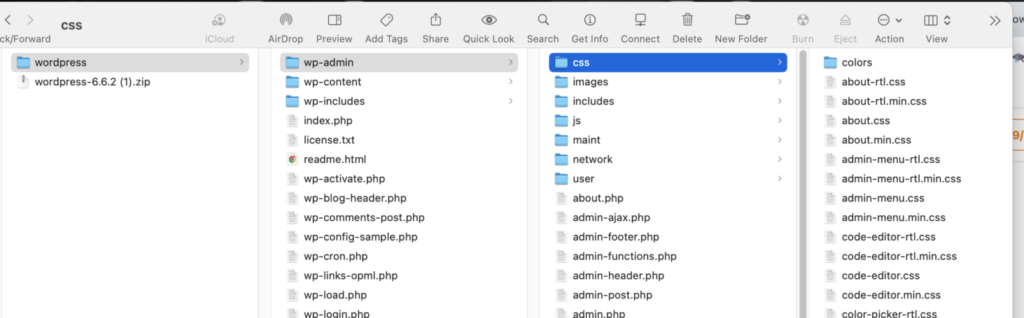
*UNZIP THE FILE* —>
.
-CREATE A [WORDPRESS DATABASE]-
.
*CLICK THE “USER ACCOUNTS” TAB* —>
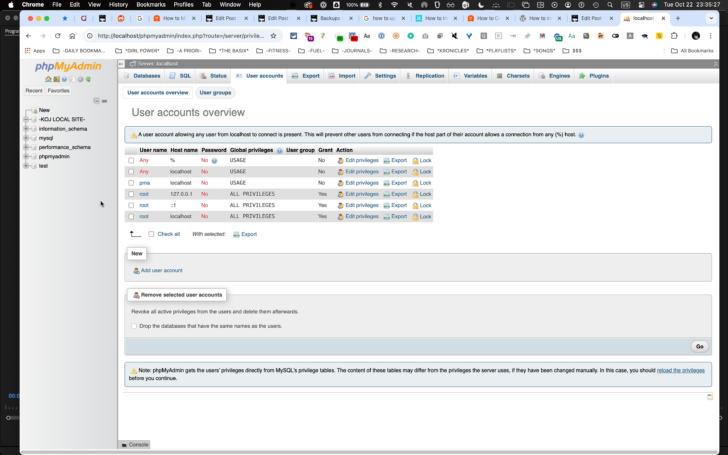
.
*CLICK THE “ADD USER ACCOUNT” BUTTON* —>
*ASSIGN A “USER NAME”* —>
(make sure “use text field” is selected)

.
“jogalive2020”
.
*SET A PASSWORD* —>
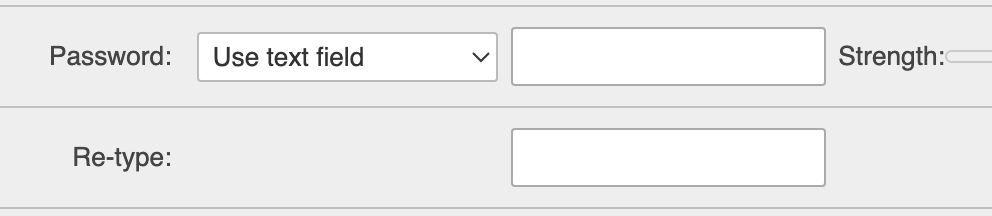
.
Banjogai2020
.

.
*CLICK “GO” IN [BOTTOM LEFT CORNER]* —>
.

.
*THE “NEW USER” IS NOW LISTED IN YOUR “USER ACCOUNTS” TAB* —>
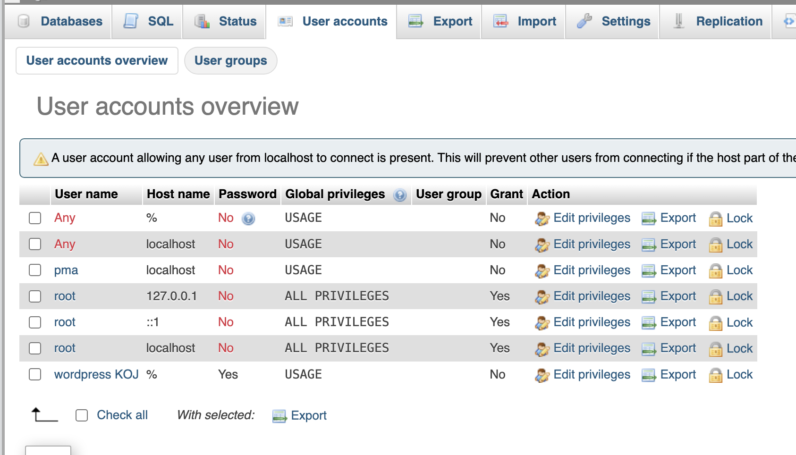
.
*CLICK THE “USER NAME” TO “EDIT PRIVILEGES”* —>
*global privileges* —>
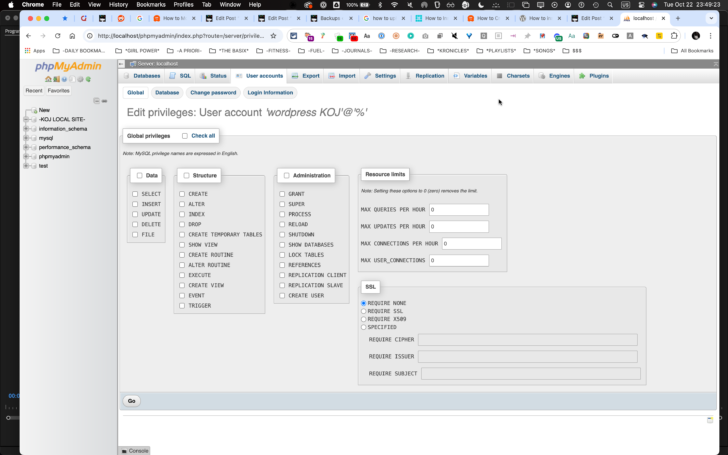
.
*click the “database tab” for “database-specific privileges”* —>
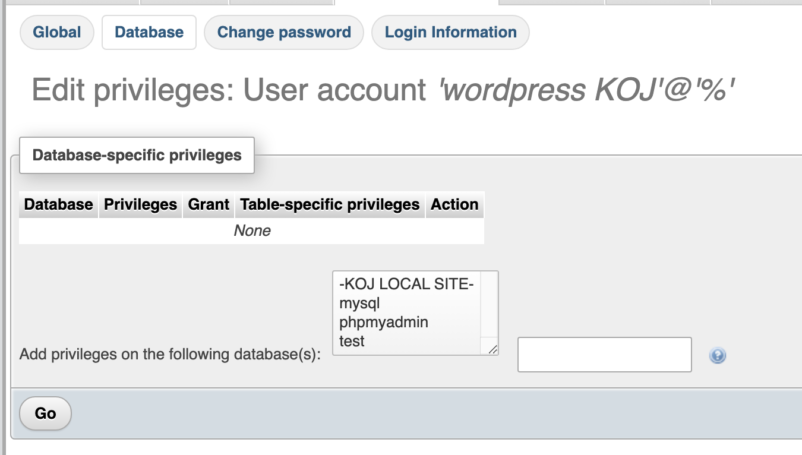
.
*CLICK TO SELECT YOUR NEWLY CREATED “DATABASE”* —>
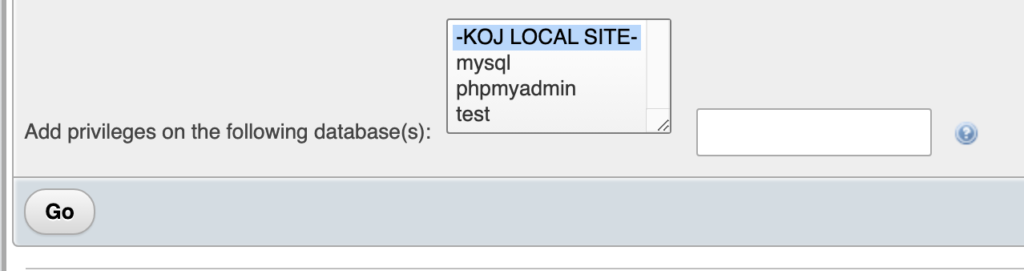
.
*CLICK “GO”* —>

.
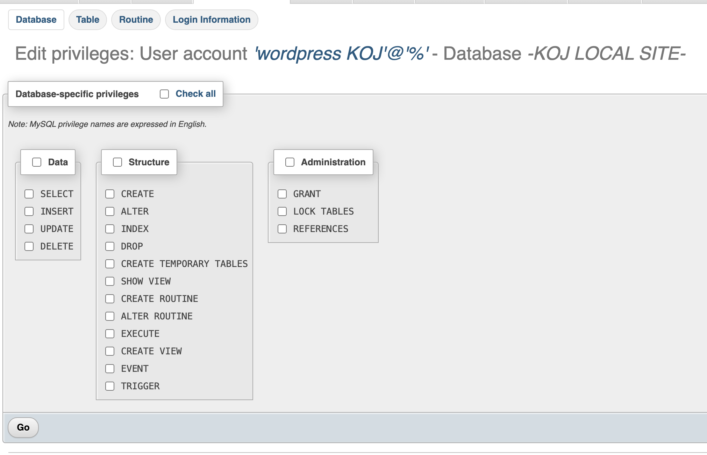
.
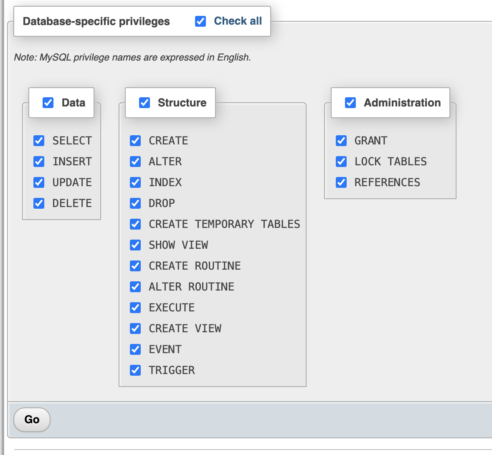
*CLICK “CHECK ALL”* —>
.
*CLICK “GO”* —>

.

.
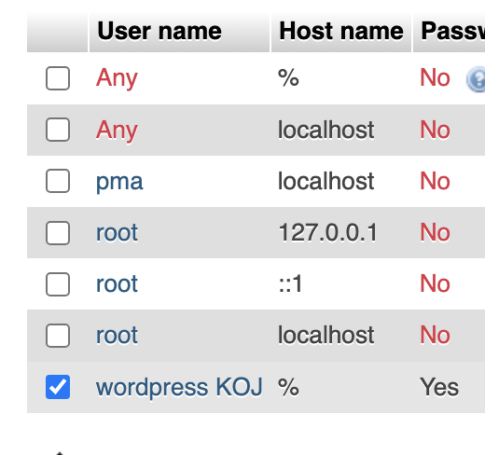
-TO REMOVE A [USER ACCOUNT], CLICK THE “USER ACCOUNTS” TAB-
.
*check the “username” on the list* —>
.
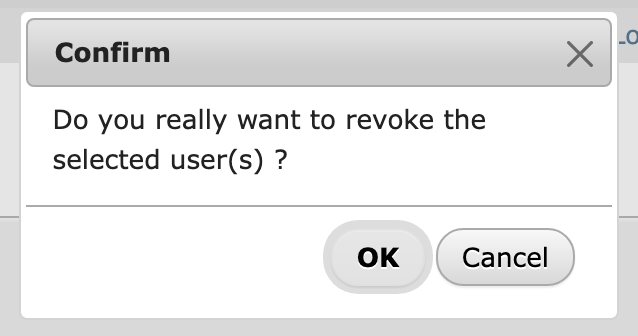
*under “remove selected user accounts”, click “go”* —>

.
*click “OK”* —>
.
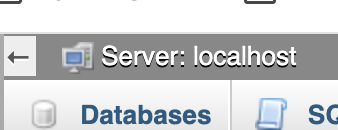
*NOTE THE “SERVER NAME” —>
.
“localhost”
.
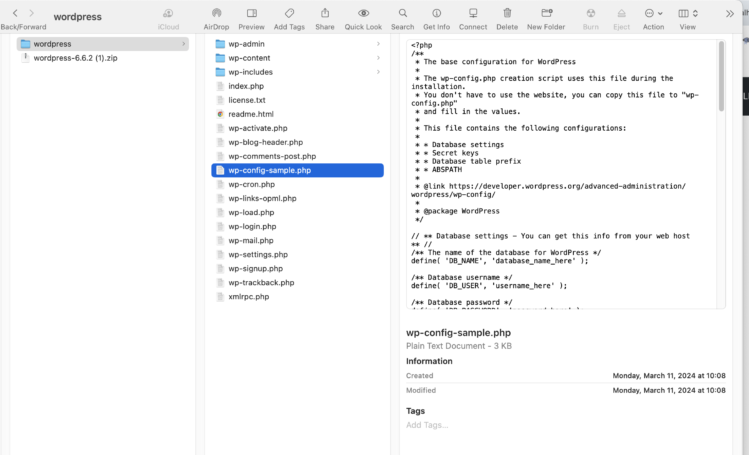
*OPEN YOUR DOWNLOADED “WORDPRESS FILES” IN FINDER* —>
.
-EDITING [WP-CONFIG]-
(LINK)
.
-SELECT THE TEXT FILE “WP-CONFIG-SAMPLE.PHP”-
.
*RENAME THE FILE* —>
“WP-CONFIG.PHP”
.
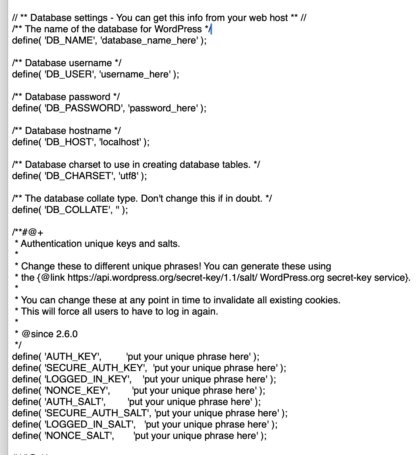
-OPEN THE FILE IN “TEXTEDIT”-
.
.
*DB NAME* —>
KOJ
.
*DB USER* —>
jogalive2020
.
*DB PASSWORD* —>
Banjogai2020
.
*HOST NAME* —>
localhost
.
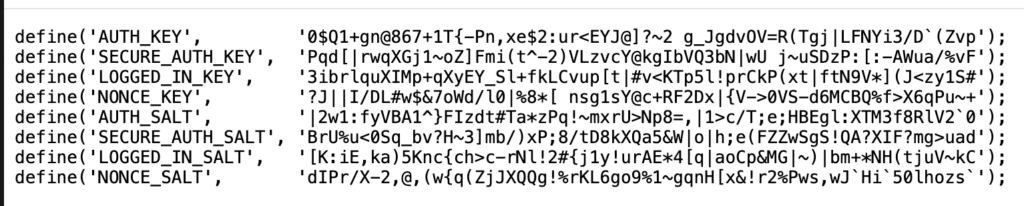
-ASSIGN “SECRET KEY VALUES”-
*click this link* —>
.
.
-SAVE/CLOSE THE [WP-CONFIG] FILE-
.
*navigate to your downloaded [wordpress files]* —>
‘/Users/joga/Desktop/-WORDPRESS INSTALLATION-/wordpress’
.
-SELECT/COPY THE FOLDER-
.
*navigate to this [file-path]* —>
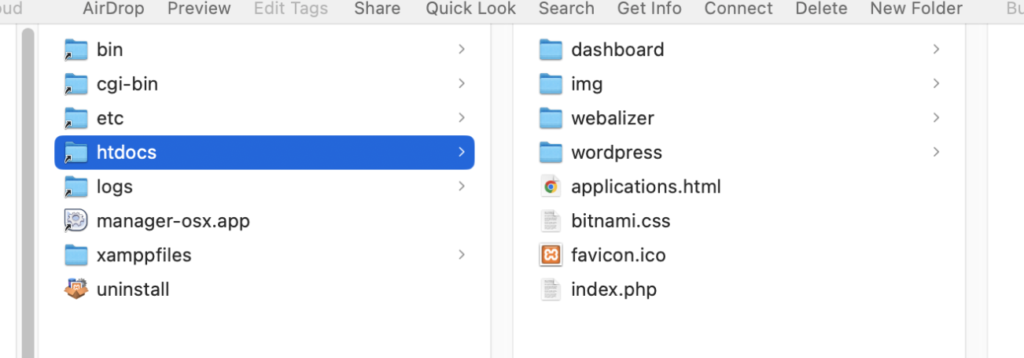
/Applications/XAMPP/htdocs
.
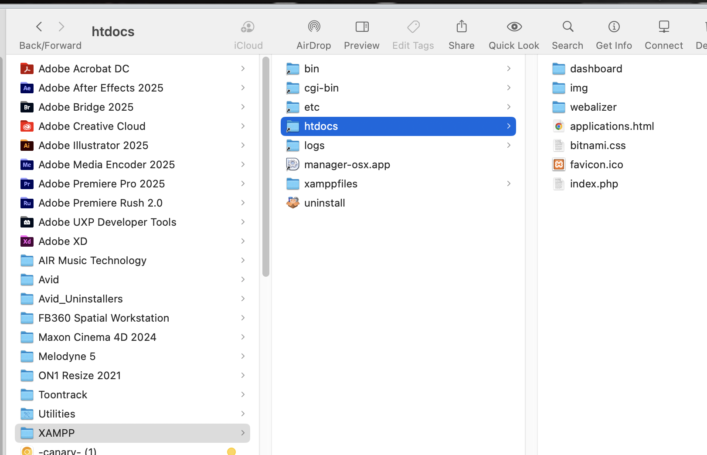
.
-PASTE THE COPIED “WORDPRESS FILES FOLDER”* —>
.
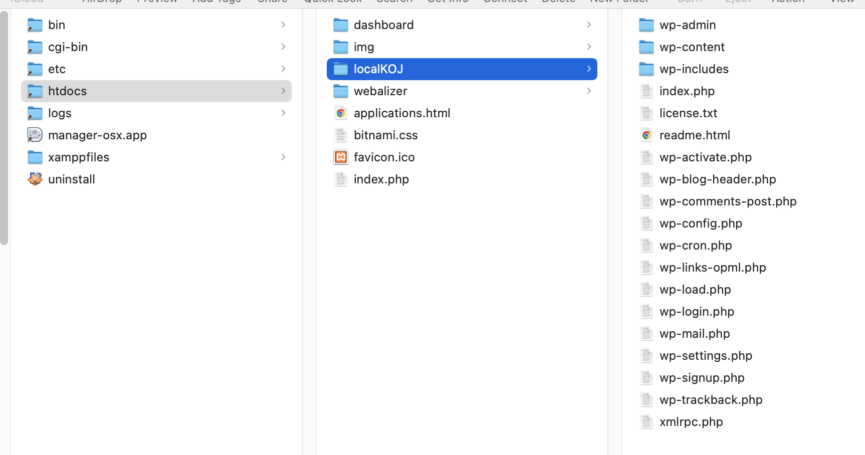
*RENAME THE “WORDPRESS FOLDER” SO YOU CAN EASILY IDENTIFY IT LATER* —>
“localKOJ”
.
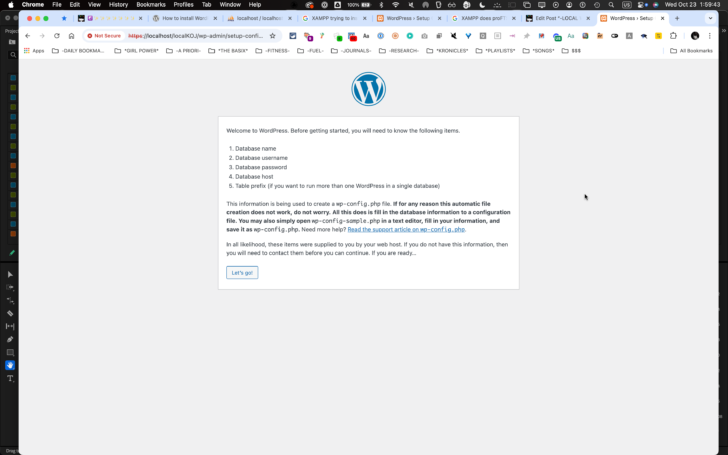
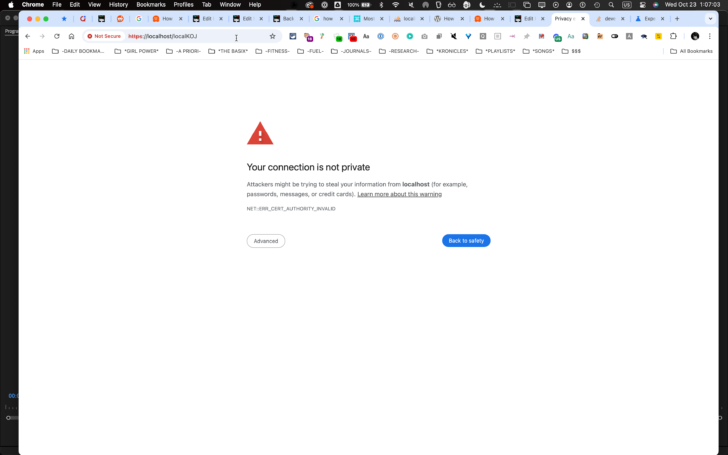
*ENTER THIS URL INTO A NEW “BROWSER TAB”* —>
https://localhost/localKOJ
.
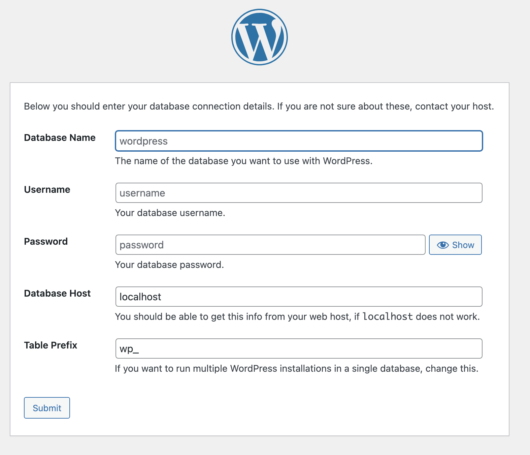
*IF YOU DO NOT CHANGE THE NAME OF “WP-CONFIG-SAMPLE” TO “WP-CONFIG”, WORDPRESS WILL TRY TO GENERATIOA A “WP-CONFIIG” FOR YOU BASED ON YOUR “DATABASE INFO”* —>
.
-DATABASE NAME-
-DATABASE USERNAME-
-DATABASE PASSWORD-
-DATABASE HOST-
.
-IF YOU WANT TO USE THE SAME “DATABASE” FOR MULTIPLE WORDPRESS SITES, YOU WILL ALSO NEED TO KNOW THE “TABLE PREFIX”-
.
*CLICK “LET’S GO”* —>

.
.
*SITE NAME* —>
LOCAL KOJ
.
*USERNAME* —>
kingofthecats
.
*PASSWORD* —>
Macca2020!
.
*E-MAIL* —>
josephjgatti@gmail.com
.
.
*GO TO THIS URL* —>
“ALLOW [INVALID CERTIFICATES] FOR [RESOURCES] LOADED FROM [LOCAL HOST]”
.

.
-CHANGE TO “ENABLED”-
.
*CLICK THIS BUTTON IN [BOTTOM RIGHT CORNER] TO RE-LAUNCH [CHROME]* —>

.
*BLUEHOST* —>
“CODEGUARD”
.
-MANAGER OSX-
-enter system password-
-restart all servers-
.
*TO LOG INTO YOUR LOCAL “WP DASHBOARD”, CLICK THIS LINK* —>
-LOCALHOST WORDPRESS [LOG-IN]-
kingofthecats
Macca2020!
.
-COPY/PASTE THE CONTENTS OF A “KOJ POST” TO YOUR “LOCAL HOST”-
.
Method 2
Manually Move a Live WordPress Site to Local Server
In case the plugin does not work for you, then you can always manually move your live site to a local server. The first thing you would need is to back up your website manually from your WordPress hosting account.
Step 1. Export your live site’s WordPress database
To export your live site’s WordPress database, you need to log into your cPanel dashboard and click on phpMyAdmin.
Note: We’re showing screenshots from Bluehost dashboard.
cPanel phpMyAdmin
Inside phpMyAdmin, you need to select the database you want to export and then click on the export tab on the top.
Export WordPress database manually
phpMyAdmin will now ask you to choose either quick or custom export method. We recommend using custom method and choosing zip as the compression method.
Sometimes WordPress plugins can create their own tables inside your WordPress database. If you are not using that plugin anymore, then the custom method allows you to exclude those tables.
Leave rest of the options as they are and click on the ‘Go’ button to download your database backup in zip format.
Select export options
phpMyAdmin will now download your database file. For more details, see our tutorial on how to backup your WordPress database manually.
Step 2. Download all your WordPress files
The next step is to download your WordPress files. To do that you need to connect to your WordPress site using an FTP client.
Once connected, select all your WordPress files and download them to your computer.
Download all your WordPress files
Step 3. Import your WordPress files and database to local server
After downloading your WordPress files, you need to create a folder on your local server where you want to import the local site.
If you are using WAMP then you would want to create a folder inside C:\wamp\www\ folder for your local site. MAMP users would need to create a folder in /Applications/MAMP/htdocs/ folder.
After that, simply copy and paste your WordPress files in the new folder.
Next, you need to import your WordPress database. Simply open the phpMyAdmin on your local server by visiting the following URL:
http://localhost/phpmyadmin/
Since you have already created the database earlier, you now need to select it and then click on the ‘Import’ tab at the top.
Import WordPress database
Click on the ‘Choose File’ button to select and upload the database export file you downloaded in the first step. After that, click on the ‘Go’ button at the bottom of the page.
phpMyAdmin will now unzip and import your WordPress database.
Now that your database is all set up, you need to update the URLs inside your WordPress database referencing to your live site.
You can do this by running an SQL query in phpMyAdmin. Make sure you have selected your local site’s database and then click on SQL.
Updating URLs in database
In phpMyAdmin’s SQL screen copy and paste this code, make sure that you replace example.com with your live site’s URL and http://localhost/mylocalsite with the local server URL of your site.
1
2
3
4
5
UPDATE wp_options SET option_value = replace(option_value,
‘https://www.example.com’
,
‘http://localhost/mylocalsite’
) WHERE option_name =
‘home’
OR option_name =
‘siteurl’
;
UPDATE wp_posts SET post_content = replace(post_content,
‘https://www.example.com’
,
‘http://localhost/mylocalsite’
);
UPDATE wp_postmeta SET meta_value = replace(meta_value,
‘https://www.example.com’
,
‘http://localhost/mylocalsite’
);
This query will replace refences to your live site’s URL from database and replace it with the localhost URL.
Step 4. Update wp-config.php file
The final step is to update your local site’s wp-config.php file. This file contains WordPress settings including how to connect to your WordPress database.
Simply go to the folder where you installed WordPress on your local server and then open wp-config.php file in a text editor like Notepad.
Replace the database name with the one you created in phpMyAdmin on your localhost.
After that, replace the database username with your local MySQL username, usually it is root. If you have set a password for the MySQL user root on your localhost, then enter that password. Otherwise, leave it empty and save your changes.
1
2
3
4
5
6
7
8
define(
‘DB_NAME’
,
‘database_name_here’
);
define(
‘DB_USER’
,
‘username_here’
);
define(
‘DB_PASSWORD’
,
‘password_here’
);
You can now visit your local site in a browser window by entering the URL like this:
http://localhost/mylocalsite/
Replace ‘mylocalsite’ with the name of the folder where you copied your WordPress files.
That’s all, your live WordPress site is now copied to your local server.
We hope this article helped you learn how to easily move a live WordPress site to local server. You may also want to see our guide on how to easily make a staging site for WordPress for testing, or how to move a WordPress site from local server to live site.
If you liked this article, then please subscribe to our YouTube Channel for WordPress video tutorials. You can also find us on Twitter and Facebook.
Disclosure: Our content is reader-supported. This means if you click on some of our links, then we may earn a commission. See how WPBeginner is funded, why it matters, and how you can support us. Here’s our editorial process.
Editorial Staff
Editorial Staff at WPBeginner is a team of WordPress experts led by Syed Balkhi with over 16 years of experience in WordPress, Web Hosting, eCommerce, SEO, and Marketing. Started in 2009, WPBeginner is now the largest free WordPress resource site in the industry and is often referred to as the Wikipedia for WordPress.
www.wpbeginner.com /wp-tutorials/how-to-move-live-wordpress-site-to-local-server/
How to Move a Live WordPress Site to Local Server
Syed Balkhi11-13 minutes 10/7/2020
.
.
.
is there a way.to backup a site as a “read-only offline file” so that you can access basic text version of the site?
.
With UpdraftPlus you can independently back up different components that make up your WordPress site.
You could choose to omit the Uploads component which would leave out any media (photos, videos etc).
You could then restore this to a local host development server using something like WAMP which would be available offline
.
-MOVE [LIVE WORDPRESS SITE] TO [LOCAL SERVER]-
(WPBEGINNER)
.
Want a safe space to experiment with your WordPress website without the fear of breaking something on your live site?
Moving your WordPress site to a local server on your computer is the perfect solution, in our opinion, especially for developers, designers, or WordPress beginners.
Installing WordPress on your computer (local server) allows you to easily learn WordPress and test things.
When you move a live WordPress site to a local server, it enables you to experiment with the same data as your live site.
In this article, we’ll show you how to easily move a live WordPress site to a local server.
Moving a live WordPress site to a local server on your computer
Why and Who Would Want to Move a live WordPress Site to Local Server?
If you have been running WordPress website for sometime, you may want to try out new themes or a plugin.
However, doing this on a live website may result in poor user experience for your users.
To avoid this, many users create a copy of their WordPress website on a local server to test new themes, plugins, or do development testing.
This allows you to set up your theme with all your content and test all the features without worrying about breaking your site.
Many users copy their site to a local server to practice their WordPress and coding skills with actual site data.
Even though you can do all the testing with dummy content in WordPress, real site data gives you a better visual representation of how these changes will appear on your live site.
.
Preparing to Move a Local Site to Local Server
First, you need to make sure that you always back up your WordPress website.
There are several great WordPress backup plugins that you can use.
Secondly, you need to install a local server environment on your computer.
You can use WAMP for Windows, and MAMP for Mac.
Once you have set up the environment, you need to create a new database using phpMyAdmin.
Simply visit the following URL in your browser to launch phpMyAdmin.
http://localhost/phpmyadmin/
http://localhost:8080/phpmyadmin/
From here you need to click on ‘Databases’ tab and create a new database.
You’ll need this database to later to unpack your live site data.
Create database
You are now ready to move your live WordPress site to local server
.
.
.
*👨🔬🕵️♀️🙇♀️*SKETCHES*🙇♂️👩🔬🕵️♂️*
.
.
👈👈👈☜*-[WORDPRESS WEBSITE] INSTRUCTIONS-* ☞ 👉👉👉
.
.
💕💝💖💓🖤💙🖤💙🖤💙🖤❤️💚💛🧡❣️💞💔💘❣️🧡💛💚❤️🖤💜🖤💙🖤💙🖤💗💖💝💘
.
.
*🌈✨ *TABLE OF CONTENTS* ✨🌷*
.
.
🔥🔥🔥🔥🔥🔥*we won the war* 🔥🔥🔥🔥🔥🔥