-as of [3 OCTOBER 2026]-
.
“BEATEDIT”
(OFFICIAL LINK)
.
The best and fastest way to do this is by combining BeatEdit’s marker generation with Premiere Pro’s native Automate to Sequence feature
This allows you to dump an entire bin of short clips onto your timeline, chopped and synced perfectly to your beat markers, with a single click
Here is the exact step-by-step workflow to execute this cleanly:
Step 1
Generate Your Target Beat Markers
First, establish the rhythm markers where you want your video clips to cut.
Select your music track and click Load Music inside the BeatEdit panel
Under Beat Selection, select your desired pacing
(e.g., select exactly 1 beat every 4 beats to cut on every 4-bar phrase) and click Select
Set your marker type to Sequence Markers (not clip markers)
Click Create Markers
You will now see a row of global markers lining the top of your timeline ruler.
Step 2
Organize and Order Your Bin
Premiere Pro will inject the clips into the timeline based on how they are sorted in your Project panel
Create a dedicated bin for your short clips (e.g., “Montage Clips”)
Set your Project Panel view to Icon View (the grid layout)
Click and drag the clips into the exact sequential order you want them to appear in your video from left to right, top to bottom.
Step 3: Run “Automate to Sequence”
Once your bin is ordered and your markers are set, you are ready to automate
Select all the clips inside your ordered bin (Cmd+A on Mac / Ctrl+A on Windows)
Go to the top menu and select Clip > Automate to Sequence
-PROJECT PANEL-
-OPEN “SEQUENCE AUTOMATION” BIN-
*SELECT ALL* —>
-[COMMAND] + [ a ]-
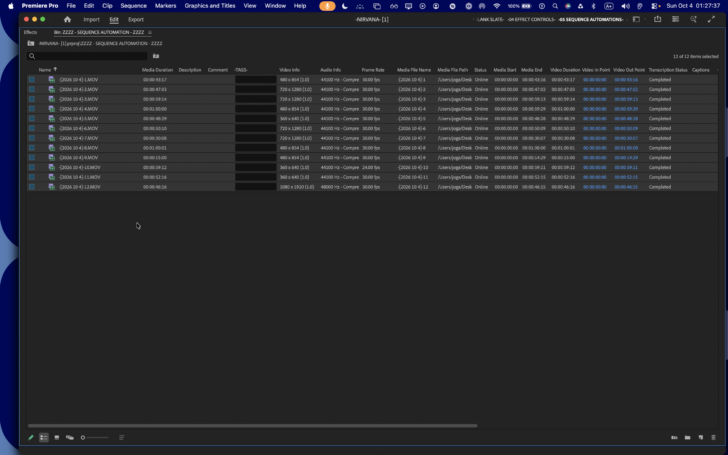
“AUTOMATE TO SEQUENCE”
*KEYBOARD SHORTCUT* —>
-[SHIFT] + [OPTION] + [CONTROL] + [ a ]-
(or click the small Automate to Sequence icon at the bottom of your project panel—
it looks like a tiny storyboard with an arrow)
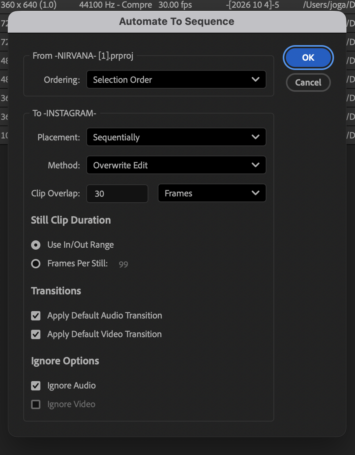
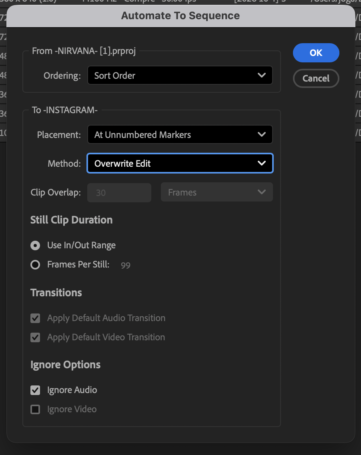
Match these exact settings in the dialog box
Ordering:
Sort Order
Placement
At Unnumbered Markers
(This is the critical setting that forces Premiere to use your BeatEdit markers)
Method:
Overlay
Clip Overlap:
0 frames
Apply Default Audio/Video Transition
Uncheck both (to ensure clean, hard rhythmic cuts)
.
.
-CLICK [OK]-
.
Premiere Pro will instantly populate your timeline, laying down your short clips sequentially and slicing their edit points perfectly on every single beat marker you generated
💡 Dynamic Pro Tips for Short Clips
The Clip Length Rule:
Ensure your short clips have enough “handles”
(underlying duration).
If a clip’s actual duration is shorter than the time distance between two beat markers, Premiere will stretch the clip or leave a blank black gap on your timeline
Target the Right Track:
Before hitting OK on the automation box, make sure your target video track (e.g., V1 or V2) is targeted/blue on your timeline panel so Premiere knows exactly which layer to place the clips on
If you run into any issues with the clips overlapping incorrectly or leaving gaps, let me know the average duration of your short clips and the BPM of your track, and we can fine-tune the layout!
.
Use BeatEdit and Automate to Sequence to Edit to a Beat
A clever use of automating to sequence with markers is editing clips to the beat of a music track.
Add Timeline markers to the beat of the song, and then use Automate to Sequence to place clips at every beat.
For $99, BeatEdit by Mamoworld will analyze the beat of a music track and automatically add markers to your sequence.
Watch this Mamoworld tutorial to see how BeatEdit can accelerate your editing to the beat in a music track.
Method
Insert and Overwrite are the two methods you can edit your clips with Automate to Sequence.
ordering-automate-to-sequence-premiere-pro
These basic editing terms are no different than.
Simply put, an Insert Edit will add clips at the point of the playhead, and everything after the playhead will be pushed down the Timeline,
An Insert edit will extend the overall duration of your edit.
An Overwrite Edit, on the hand, will not change the overall duration of your edit because the new clips will replace the existing ones beginning at the playhead.
Most likely you will want to use the Overwrite Edit method when automating to sequence At Unnumbered Markers.
Otherwise, the clips will push the markers further down the Timeline like any insert edit would.
This may be helpful if you want to continue automating different bins of footage based on the same marker distance.
Clip Overlap
You can add handles to your automated clips by adjusting Clip Overlap.
clip-overlap-automate-to-sequence-premiere-pro
Handles are necessary for adding transitions, or if you want to finesse your edit points using Trim Mode.
The Clip Overlap value can either be in Frames or Seconds
.
NOTE:
Clip Overlap can only be used when placement is set to Sequentially. It will not work with At Unnumbered Markers
.
Still Clip Duration
still-clip-duration-automate-to-sequence-premiere-pro
When automating still clips (images, color mattes, black video, adjustment layers, etc.) you can set the duration to Use In/Out Range or Frames Per Still
.
Here’s a tutorial that will teach you how to open multiple clips in the Source monitor to quickly add custom in and out points to your still before automating them to a sequence
.
Use Automate to Sequence to Create Time-lapses
Some Premiere Pro users say you have to adjust the Still Image Default Duration under Preferences > Timeline to import your still images with a specific duration before adding them to a sequence.
This means you have to delete them from the project, adjust the preference and reimport them if you want to change their duration.
The fact is that this can easily be done using Automate to Sequence with the Still Clip Duration set to Frames Per Still.
No matter what the Default Still Image Duration preference is, you can decide how long you want your still clips to be in your Timeline with Automate to Sequence.
Transitions
Automate to Sequence gives you the handy option of adding transitions to all your automated clips.
transitions-automate-to-sequence-premiere-pro
It’s important to note that Automate to Sequence only applies your default transitions.
(Most likely these are Cross Dissolve transitions.)
To customize your default transitions, go to the Effects panel > Video Transitions folder, right-click any effect and Set Selected as Default Transition.
For example, in the image below you can see that I’m setting the Wipe transition as my default effect.
The same can be done for Audio Transition effects.
default-video-transition-premiere-pro
NOTE:
Premiere Pro won’t add transitions in Automate to Sequence if there isn’t any Clip Overlap.
Automate to Sequence transitions obey your Video and Audio Transition Default Duration preferences.
You can customize these under Preferences > Timeline.
Of course, the transitions are limited to the number of clip handle frames.
So even if your transition default duration is 30 frames, but you only have 10 frames of handles, the transition will only be 10 frames.
That’s another thing, the transitions can only be centered to the cut.
Hopefully someday Premiere Pro users will be able to select video and audio transitions within the Automate to Sequence window instead of having to use the default transition.
Tell Adobe you want this feature!
Use Automate to Sequence to Fix Audio Pops
Short audio Cross Dissolve transitions can eliminate audio pops at edit points, especially on jump cuts.
Editor, Derek Lieu explains this audio pop fix in much greater detail in the tutorial below.
It’s convenient that this technique can be done with Automate to Sequence before you begin editing.
Make sure you set your Audio Transition Default Duration to something small like 2 or 4 frames before you add audio transitions to your Automate to Sequence.
TIP:
Once you’ve automated your clips to your sequence with audio transitions (or video transitions) use the default keyboard shortcuts Q and W for Trim Next/Previous Edit to Playhead (a.k.a. top and tail edits) to quickly trim your clips without removing the transitions.
Ignore Options
Don’t “ignore” this last setting… sorry, we’re almost done.
ignore-options-automate-to-sequence-premiere-pro
Automate to Sequence gives the option to Ignore Audio or Video in your clips.
This is handy if you’re wanting to automate a bunch of clips but leave behind the audio or video.
It saves users the extra step of deleting the video or audio after automating clips to a sequence.
And that’s how to Automate to Sequence in Premiere Pro.
It’s a feature that combines several steps into one simple automated process.
Even if you don’t see how , chances are you’re going to get a simple project like a glorified slideshow, or a ton of b-roll you got to turn into a selects sequence, Automate to Sequence will get you going faster then manually adding clips to your sequence.
Do you have any thoughts on Automate to Sequence in Premiere Pro?
I’d like to hear how you’ve used this feature in your projects.
I answer every comment, so drop me something below!
Thanks for reading!
premierebro.com /blog/automate-to-sequence-in-premiere-pro
Automate to Sequence in Premiere Pro — Premiere Bro
Sean Schools
11-14 minutes
automate-to-sequence-in-premiere-pro
.
.
.
*👨🔬🕵️♀️🙇♀️*SKETCHES*🙇♂️👩🔬🕵️♂️*
.
.
👈👈👈 ☜ *-“SEQUENCE AUTOMATION” (PREMIERE PRO)-*
.
.
.
💕💝💖💓🖤💙🖤💙🖤💙🖤❤️💚💛🧡❣️💞💔💘❣️🧡💛💚❤️🖤💜🖤💙🖤💙🖤💗💖💝💘
.
.
*🌈✨ *TABLE OF CONTENTS* ✨🌷*
.
.
🔥🔥🔥🔥🔥🔥*we won the war* 🔥🔥🔥🔥🔥🔥
I play during my lunch breaks and this site makes the most of my short gaming sessions. Everything loads instantly and the interface is clean without unnecessary clutter. It is refreshing to find a platform that actually respects the players time. idqqnusa