
-as of [13 SEPTEMBER 2026]-
.
.
*COMMANDS* —>
.
.
*TARGET THE TRACKS THAT YOU WANT THE SPLIT TO APPLY TO* —>
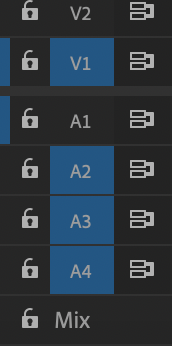
.
-MOVE [PLAYHEAD] TO THE [TIME-CODE] WHERE YOU WANT THE [SPLIT] TO OCCUR-
.
*split clip* —>
-[COMMAND] + [ k ]-
(the clip does not have to be selected)
.
-YOU CAN SPLIT THE [CLIP/SEQUENCE] IN [SOURCE MONITOR] + IT WILL BE DISPLAYED IN THE [TIMELINE]-
.
-IF YOU SPLIT THE CLIP IN [SOURCE MONITOR], IT BECOMES THE NEW [OUT POINT]-
*ITS SHORTENED LENGTH IS DISPLAYED WITH [GRAY BAR]* —>
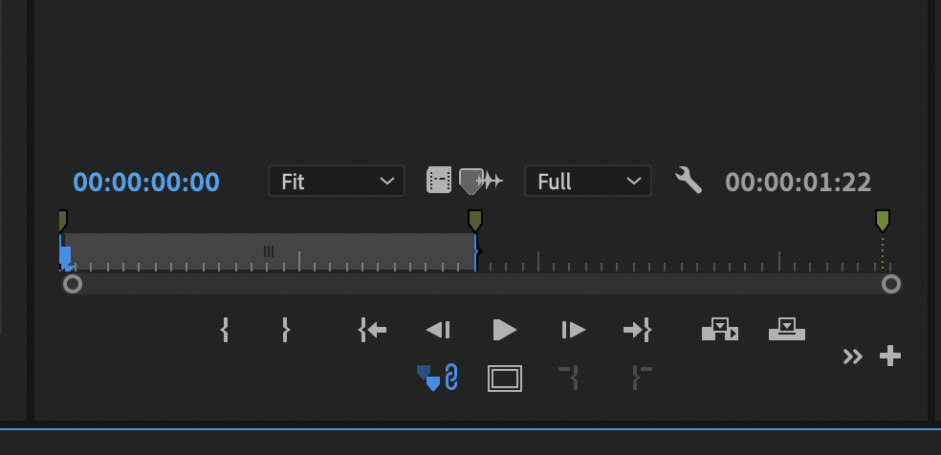
.
*THE [SPLIT FUNCTION] IS CALLED “ADD EDIT” IN [PREMIERE PRO]* —>
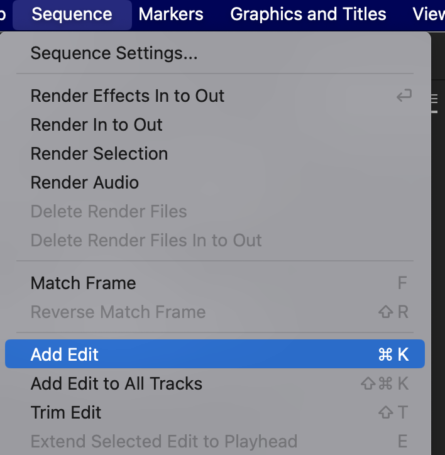
.
*TO IGNORE “TRACK TARGETING” + SPLIT ALL CLIPS AT [PLAYHEAD POSITION]* —>
-[SHIFT] + [COMMAND] + [ k ]-
OR
-SPLITS ONLY THE TRACK YOU ARE HOVERING OVER–
-CLICK INSIDE THE TRACK AT DESIRED [TIME-STAMP] TO SPLIT IT–
-IT WILL SPLIT BOTH [VIDEO/AUDIO TRAX] FOR [LINKED TRAX]–
.
*TO SPLIT ONLY THE [VIDEO/AUDIO]* —>
[OPTION-CLICK]
.
*CANNOT BE APPLIED TO [LOCKED TRACKS]*
*”TRACK TARGETING” IS IGNORED*
.
*TO SPLIT ALL [VIDEO/AUDIO TRACKS] AT THAT [TIMESTAMP]* —>
-[SHIFT-CLICK]–
.
-[THROUGH EDITS]-
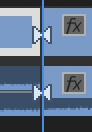
*”THROUGH EDITS” ARE [SPLITS] IN WHICH THE [CLIP] IS NOT CHANGED FROM BEFORE/AFTER [SPLIT]*
*THEY ARE MARKED WITH [INWARD-POINTING WHITE TRIANGLES]* —>
.
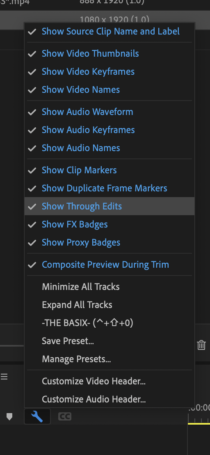
*SHOW/HIDE “THROUGH EDITS” IN [TIMELINE SETTINGS]* —>
(they are shown by default)
.
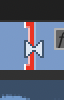
*TO SELECT A ‘SPLIT’, HOVER OVER THE SPLIT UNTIL YOUR POINTER CHANGES TO THIS* —>

.
*CLICK THE [SPLIT] TO SELECT IT* —>
(ONLY THE [LEFT/RIGHT SIDE] OF THE [SPLIT] WILL BE SELECTED)
.
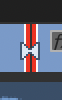
*[COMMAND-CLICK} TO SELECT BOTH SIDES* —>
.
*IF YOU CLICK ANOTHER [SPLIT SIDE], ALL SELECTED [SPLITS] WILL BE DE-SELECTED*
*[SHIFT-CLICK] TO SELECT MULTIPLE [SPLITS]*
*[SHIFT-CLICK] AGAIN TO DE-SELECT ONLY THAT SPLIT*
*CLIP ANY EMPTY SECTION OF THE PANEL TO DE-SELECT ALL SPLITS*
.
*PRESS [DELETE] TO DELETE THE SELECTED SPLIT*
(WHEN YOU DELETE 1 SPLIT SIDE, THE OTHER SIDE IS DELETED AS WELL)
.
-THIS IS CALLED “JOIN THROUGH EDIT”-
.
*YOU CAN ASSIGN A [KEYBOARD SHORTCUT] TO JOIN ALL “THROUGH EDITS” AT ONCE*
.
*I ASSIGNED THIS KS* —>
[COMMAND] + [OPTION] + [CONTROL] + [ j ]
.
Cutting or splitting clips is one of the foundations of video editing.
Learn how you can remove unwanted sections of a clip in Premiere Pro.
Splitting a clip creates a new and separate instance of the original clip.
The resulting clip is the revised version of the original clip but with different In and Out points
.
Split clips on targeted tracks
Select the headers of the desired tracks to target them.
Position the playhead where you want to split the clip or clips.
Select Sequence > Add Edit, or use Ctrl + K (Windows) or Command + K (macOS).
To split all clips except locked tracks, select Sequence > Add Edit to All Tracks to split tracks in the Timeline panel.
If you want to change Effects settings over time, don’t split the clip —
you can apply keyframes to a single clip instead.
.
Remove unnecessary cuts
A through edit is a cut in a clip where there is no change on either side of the cut —
usually, it’s made by mistake.
Remove these unnecessary cuts by enabling through edits.
To view through edits, select the wrench icon at the upper-left of the Timeline panel and select Show Through Edits.
When enabled, all through edits in a sequence are shown with small white triangles.
To remove a through edit and rejoin the two sides of the clip, select the triangle and then select Edit > Clear.
-to remove multiple through edits, use shift-select with the Selection tool and then delete them-
(you can do this from the ‘selection tool’)
(shortcut is ‘v’)
.
.
.
*👨🔬🕵️♀️🙇♀️*SKETCHES*🙇♂️👩🔬🕵️♂️*
.
.
👈👈👈☜*-[PREMIERE PRO] INSTRUCTIONS-* ☞ 👉👉👉
.
.
💕💝💖💓🖤💙🖤💙🖤💙🖤❤️💚💛🧡❣️💞💔💘❣️🧡💛💚❤️🖤💜🖤💙🖤💙🖤💗💖💝💘
.
.
*🌈✨ *TABLE OF CONTENTS* ✨🌷*
.
.
🔥🔥🔥🔥🔥🔥*we won the war* 🔥🔥🔥🔥🔥🔥
Leave a Reply